- Posted By: beekeeper
- Comments: 0
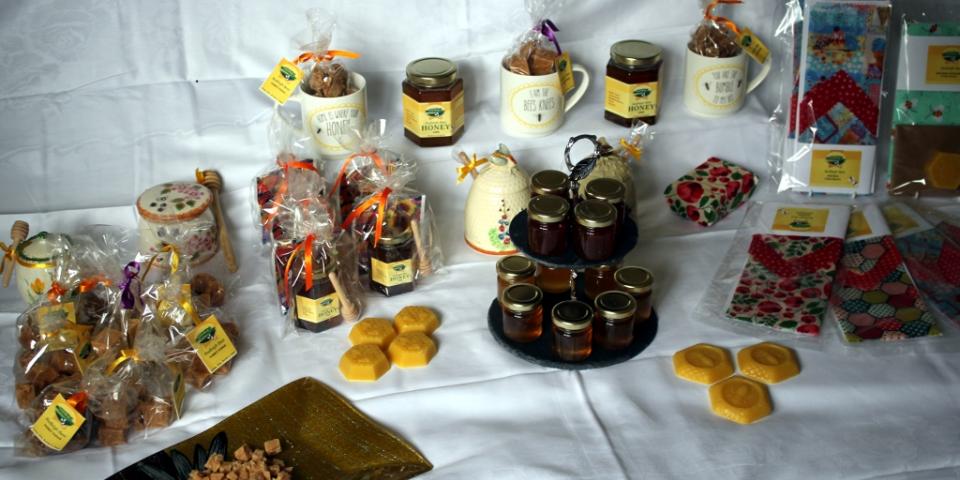
Well a month has gone by since I last wrote, so what have I been up to? With more honey this year (due to having more colonies), I decided to get a little creative to see what ideas I could come up with - all using products from the hive. It's been fun learning but also challenging to get the effect I was looking for, but the hours spent trying ideas and eventually seeing them finished has been very rewarding.
With Christmas only weeks away, I made up the little gift sets that proved very popular last year. The only difference this year is that I have started using the hexagonal shaped jars as think honey looks absolutely super in them. They are set off a treat in their bags tied with yellow and ribbons.
With the prospect of having a stand at a food fair, a beekeeper friend suggested I should make some honey fudge. "Easy" she said! Having searched the Internet for different recipes, I settled on the one I liked for honey fudge. It's pure indulgence compared to other recipes so I set about buying all the ingredients and a couple of 7" cake tins especially for the making of the fudge. I don't know if it was beginner's luck, but the first batch I made was absolutely delicious - not so the second or the third - but I stuck with it and eventually got the hang of it. I think the lesson learnt with fudge is to make sure you get the temperature right up to where it needs to be otherwise it just doesn't set and to stir, stir, stir to avoid it turning into treacle!
My biggest challenge was having a go at making eco-friendly food wraps. With the shift in how many of us feel about using plastic wrapping, I thought it would be good to make these with the wax cappings I had saved from my very first honey extraction back in 2016. The main reason is that is is extremely clean and needed very little filtering to remove any debris that might have been in there. Before making a start, I found a couple of videos on the Internet and watched them for tips. I liked the idea of sprinkling grated wax onto the material between a couple of sheets of grease-proof paper rather than the oven method, so set about going into town to get everything I needed. I must have spent hours in the fabric shop, but came away satisfied with what I had chosen. This was going to be easy! No. It definitely wasn't. There was a lot of hard graft in grating the wax down before I could start. Then there was the cutting of the material into three sizes and checking the materials all worked with each other. Eventually it was time to wax the material. Remembering what I had picked up, I placed one sheet of grease-proof paper on a baking tray, laid the first piece of fabric down, sprinkled wax on top and laid another sheet of grease-proof paper on top. With a warm iron, I gently ran it all over and watched the wax gently melt. You have to be quite quick to remove it from between the two sheets, otherwise it all sticks together! The lesson I learnt from this was not to rush and make sure there's enough grated was before you start. The end result though is amazing and the wax wraps certainly work holding their shape around things.
With some wax cappings still left over, I made up some beeswax blocks too and they not only look great, they smell divine. Some of them I've put together with some cotton fabric to sell as food wrap starter kits!
Sadly the food fair was cancelled due to Storm Callum causing severe weather conditions making it difficult for people to travel safely. I've already booked myself at a Christmas craft fair so will be quite pleased (and proud) of what I've made helping to spread the goodness of honey and products made from the beehive.
The image used has been published under the terms of a Creative Commons License and is attributed to Jenifer Tucker.